Wednesday, October 31, 2012

Halloween Fun


Ella had fun dressing up our dog, Sasha, in the tutu and fairy wings. I think the dog had less fun than she.


Pumpkin seeds for roasting. Check various internet sites for how-to. Basically toss with a little melted butter, add some seasoning (we did cinnamon and sugar) and roast at 300F for about 45 min. 
Frankenmallows! 

 Here's Sunday evening's craft project: Thank you, Pinterest!

Prep and proper supplies is everything here. That, and a few hours standing in the kitchen - these are not a good last minute project.

Gather these supplies:

Bag of fresh regular-size marshmallows
Bag of 6" lollipop sticks
2 bags of Wilton green candy melts
1 bag of Wilton black candy melts
 Large styrofoam - use as surface for holding pops upright
 Optional: clear or decorated cellophane bags with ties (or ribbon) for packaging

This project made 61 Frankenmallows.

Assembly:

  1. Poke holes in your styrofoam with a bamboo or metal skewer. (Makes it easier than pushing the lollipop sticks in.) Ensure the holes are far enough apart that the finished Frankenmallows don't "kiss!"
  2. Put a lollipop stick in each marshmallow. (Good job for your kid-helpers!)
  3. Melt the green candy melts in a double boiler or microwave. (I use my 4-cup Pyrex and the microwave, stopping to stir every 45 seconds or so.) Dip each pop in the green candy, letting excess drip off, then place in styrofoam holder to set up. This depends on ambient temperature, maybe 30-60 minutes.
  4. Melt half of the black candy melts as above and dip just the heads. Let candy set up in the foam. (Don't wash your Pyrex just yet.)
  5. Melt the other half of the black candy melts, then spoon into a Ziplock bag. Snip a very small corner and carefully pipe the eyes, mouth and "bolts" onto each pop. (After about the first 10 or 15, you may be wondering why you undertook this little project and why you still have 40+ faces left to pipe.) If your candy starts getting hard in the Ziplock, just microwave it maybe 10 seconds or less. Let the finished pops set up.
  6. Package in cute cellophane bags, as desired. Watch the kids go crazy about them!

Finished product - fun but a lot of time.

 Here's what you can do if you have left-over black candy melts. Set out wax paper and pipe spider webs and/or spiders. Spiders are just a "blob" of candy in the middle and pipe 8 legs outward.
Pumpkin Rice Krispy Treats

This is the easy 15 minute project and it made 28 pumpkins.

Supplies: rice cereal, mini marshmallows, butter, food coloring (red/yellow), green candy for stems (I used Jelly Bellies) and cupcake papers, if desired.

 Make a batch of Rice Krispy treats. My basic recipe: microwave 1/4 c. (1/2 stick) of butter until melted. Add 4 c. mini marshmallows, stir and microwave until those are melted (stir intermittently). Add food coloring to make a bright orange - remember it will be "diluted" with the cereal so go bright. Add 5 c. of rice cereal and stir well.


To make the pumpkins: set out wax paper and get your handy-dandy scoop (I used the Pampered Chef large). Spray some Pam on the scoop and scoop out individual balls onto wax paper. Try to pack the mixture into the scoop so it stays together, but don't worry if they fall apart a bit. When all mixture is scooped, spray your (clean) hands with Pam and mold the pumpkins into tight rounds and place into cupcake papers. Make a small divot in the center. Add a jelly bean for stem to finish. Viola! Easy peasy and cute to boot.

Friday, October 26, 2012

Winter Beauty

Here's a quick post today - just the fluffy peacefulness of a snowy golden sunrise in our front yard. (Do your best to ignore the power lines.)

For this afternoon, it's bright, sunny and the snow is leaving us...

Wednesday, October 24, 2012

Italian Sausage, Kale and Potato Soup - YUM!

October 24, 2012

Here's another recipe I threw together, all mine but inspired by a certain national chain Italian restaurant's soup. Tried to keep it healthy, fast and appealing to two kids.

Italian Sausage, Kale and Potato Soup


(I planned to make this soup a day ahead – those of you as my patients looking for nutrition advice usually hear how important meal planning is from me! Assembling a meal is easy when all your ingredients are there and you have a plan. The kale and celery were in this week's Bountiful Basket.)

So, to do it right, bake some potatoes (3 for this soup, and a few to chop and sauté for some breakfast hashbrowns on the weekend and/or some for another meal this week – handy topped w/ chili!).

My favorite method for easy, perfect baked potatoes
  • scrub several medium to large nice looking potatoes
  • wrap in aluminum foil
  • toss in crock pot on low for about 8 hours (eh, maybe 6ish, maybe longer if you end up working late)
  • ENJOY


Okay, back to the soup. Here's the ingredients:
  • 3 T. butter (use olive oil, if you prefer)
  • 1 onion, chopped
  • about 3 good-sized carrots, diced
  • about 2 stalks celery, diced
  • 4 cups chicken broth or stock (I can't really tell the difference personally.)
  • 3 baked potatoes, peeled (unless you can get your kids to eat peel)
  • 1 pound Italian chicken sausage (I use mild for my kids.)
  • 1 bunch kale (Tuscan or regular), washed and chopped, with tough stems pulled out
  • 1/2 cup half and half, more if you like
  • salt, black pepper and crushed red chiles, to taste.
If you have your potatoes baked already, this takes about 45 minutes start to finish. (This includes the allowance for at least 1 dozen "mommy distractions," including homework emergencies, laundry and whatever else comes up.)

Use a medium stockpot and melt the butter over medium heat. Add the onions and saute 3-5 minutes (but don't brown them!). Meanwhile, cook the sausage in another skillet - remove the casing, crumble and brown over medium heat. Back to your stockpot with the onions and butter: add the carrots and celery and a good sprinkle of salt and cook another 3-5 minutes, until tender. Add about 2 cups of the chicken broth and 2 of the potatoes somewhat chunked up, maybe a little more salt. Now, here's the fun part - get your boat motor (that's immersion blender to the culinary types) and pulse the veggies and broth in the stockpot. You can vary the amount of blend. The mushed baked potatoes will thicken this soup, contributing to its filling quality and will make it a bit creamy while using less cream. 

Okay, the work is done! Throw in the cooked sausage, the chopped kale and the remaining baked potato which should be chopped into small bite-size chunks. Let it cook until the kale is to your desired doneness (maybe a half hour or so). Season with salt and pepper, if your kids will let you. Just before serving, all the half and half and adjust seasonings. The crushed chiles really add great flavor - you may need to add these to your bowl individually. 

Serve with some bread and a salad for a meal. Makes 4-6 servings


Sunday, October 21, 2012

Weekend at Yellowstone Bear World

Sunday, October 21, 2012

Just thought I'd put a short blurb about our family's goings on recently. I was away in Boise for my PANRE (Physician Assistant recert exam) and had dedicated most of my spare time for a couple months to this expensive, anxiety-provoking yet somehow necessary endeavor.

We hit the end of the season weekend at Yellowstone Bear World in Rexburg. It was a blast! So many more bears than we expected (we had visited once, years ago), along with admission to the petting zoo and rides included. (I'm a sucker for a deal. The $1 hot dogs and drinks were nice too!)


What's this guy doing at Bear World? I don't know but he's mighty handsome

 The petting zoo was incredible! Several young, adorable deer to feed. 
Two of the six cubs, wrestling as kids do


And stay tuned - I won't know if I remain a PA until my score report arrives, in about 2 weeks.

Monday, October 15, 2012

4H Cupcake Class - SUPER Cute (and Easy) Ideas

Can I just say that I love the 4H program!?! I wish they did these fun classes for adults, too. But today, Ella got the fun - Class 2 (of 3) in Cupcake Decorating. (Mostly pictures here, with a few notes so I can remember what that little yellow beak was made from next time I try to recreate these.)


Little lambie: Make the face first with a flattened purple gumdrop. Use a toothpick to poke nostrils. Use store-bought candy eyes. Multiple mini marshmallows all over for the body. Use small pieces of black licorice for ears and tail. Sprinkle with colored sugar if desired.


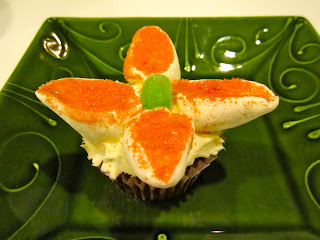
Flower: Beautiful, isn't it? Cut 2 regular size marshmallows diagonally and cover the cut side with colored sugar, place gumdrop in the middle. 


Alien: (Ella tells me this is missing one eye - she got hungry.) Green Twizzler rope, red colored sugar over icing. The eyes are made of a gumdrop inside a gummy ring, toothpicked into cupcake.


Owl: My absolute favorite! Split an Oreo in half. (If I was publishing this and avoiding trademarked names, I would say a chocolate sandwich cookie here.) Use a yellow jelly bean for the nose and green M&Ms for the eyes. (Feel free to change up the colors.) Use two whole almonds for the ears. Add some chocolate jimmies (Ella says "sprinkles!") between the eyes and ears.


Thanks to my sweet daughter, Ella, for making these! And thanks to Bannock County 4H for the class. Time to go sample the cupcakes now.

Saturday, October 13, 2012

Beginning of a Blog

I finally decided to dive in and try my hand writing a blog, as I've been a lurker for a year or so, enjoying everyone else's - looking mostly for ideas for recipes and crafts. I really need to be doing something else today (studying for my upcoming test) but this sounded like a good distraction.

I mostly hope to document a few things for my kids, can put together some family recipes and fun. Well, more on my test, blog dreams and family soon.

It seems tough to have an original idea to put out on the web these days! So, here's a recipe I made up for our camp trips (apologies if it resembles anyone else's - it would be pure coincidence, or co-ink-i-dink as Popeye would say).

We recently upgraded our camp trailer, but this was created to make the most of a propane stove, one cast iron pan (~10") with a lid. My aim was to be simple, combining food that was healthy, including some veggies and get both my kids to eat it. What I love about it is the flexibility for individual tastes too! (see Variations below.) We make Pizza Mac almost every trip now. Here's the recipe. 

Pizza Mac

Here's the base recipe:

  • 1 pound Italian chicken sausage (You can use regular pork sausage, but it requires draining a bunch of fat). 
  • ~1/4 c. turkey pepperoni slices, chopped up (Again you can use regular pepperoni if you want more fat.)
  • 3/4 box of pasta (any relatively small shape is good here - we like the mini wagon wheels, shells, or whatever); I usually try to use whole wheat or the Barilla Plus with extra protein and omega-3
  • 1 jar or can of pizza sauce (if you are truly camping, I try to avoid the glass jar due to breakage concerns)
  • ~2 cups shredded mozzarella cheese

Instructions: Brown the sausage over medium heat in cast iron skillet. If it is bulk sausage, just dump it in the pan and break it up with a spatula as you cook it. If it comes in casing, split the casing and remove before cooking. When you use chicken sausage, you really shouldn't have any fat to drain. Once the sausage is browned with no pink, stir in the pepperoni and cook 1-2 minutes. 

Then dump in the dry pasta, pizza sauce and then fill up the jar or can from the sauce with water one or two times and add to mixture. (I usually use about 1.5 cans of water - use more if you like runnier, saucier end product, a little less if you like it drier.) Stir and cover, reducing heat to med-low. Cook for about 10 minutes (check the cook time on your pasta as a guideline) - again less time if you like al dente (the way pasta should be prepared), more time if you like American-style pasta mush. (Guess which I opt for?)

Open the lid a couple times during cooking, stir and add more water if looks like it's getting all absorbed by the pasta. When the pasta is cooked to desired doneness and liquid is absorbed to desired level, top with cheese and serve. (If it looks too runny, you can turn up the heat and cook it a couple minutes with the lid off.)

Variations: 
  • Brown some chopped onion (1 small or 1/2 large) and 1-2 cloves of garlic with the sausage. 
  • With the pasta, sauce and water step, Stir in some: 
    • chopped red or green bell pepper
    • sliced olives
    • canned or fresh sliced mushrooms
    • any other pizza toppings you like (ham, Canadian bacon) - can't say that pineapple appeals to me...
(I owe you a mouth-watering photo here and I thought I took one. Can't find the file, so how about a classy picture of my handsome husband, rednecking-it-up with a PBR and Jiffy Pop - we are classy campers, don't ya know.) 


You could go fancy and add sun-dried tomatoes, some fresh basil, or anything else you like in your pizza. But, with camping, it's all about easy, simple and appealing to everybody's tastes. 

We sometimes make a Pizza Rice variation (just white Minute Rice in place of the pasta).

It's especially great to serve with those little packets of parmesan cheese and dried red pepper that come from pizza restaurants. (We try to keep these stocked in the trailer.) 

There you have it - my first blog entry and I've wasted a lot of time that should have been spent studying. Enjoy!

                   Cindy